What is a Wireless microphone?
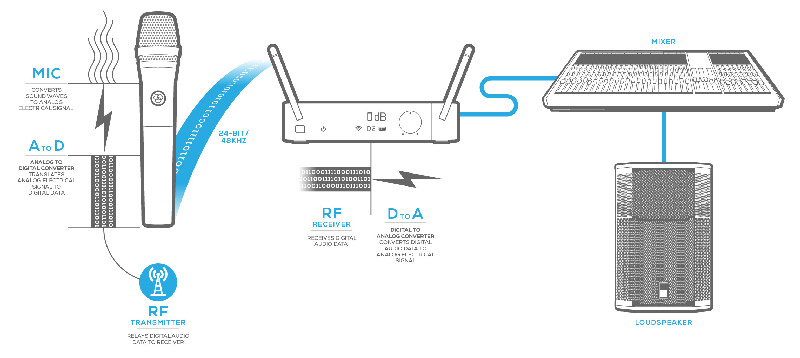
A wireless microphone is a microphone that does not need a physical connection to a sound system or recording device. Instead, it uses radio waves to send the audio signal to a receiver. Which connects to the sound system or recording device.

This allows for greater flexibility and freedom of movement for the person using the microphone. Wireless microphones in live performances, presentations, and broadcasting. They come in different types such as handheld, lapel, and headset microphones.
They also come in different frequencies, with UHF and VHF being the most common. Wireless microphones are convenient and easy to use, and they can use in a variety of settings.
How does a wireless microphone work?

A microphone is an instrument that converts sound waves into electrical signals. This allows the sound to amplify, recorded, or transmitted through a medium such as radio waves or a wire. There are several different types of microphones, each with its own unique properties and uses.
- The most common type of microphone is the dynamic microphone
This type of microphone uses a diaphragm, or a small thin piece of material, to convert sound waves into electrical signals. The diaphragm connects to a coil of wire, which surround a magnet. As sound waves hit the diaphragm, it moves back and forth, causing the coil to move within the magnetic field. This generates an electrical current, which is then sent through a cable to an amplifier or other device.
- Another type of microphone is the condenser microphone
This type of microphone uses a thin metallic diaphragm placed close to a metal plate called a backplate. A small amount of voltage applies to the diaphragm, creating a small electrical charge. As sound waves hit the diaphragm, it moves back and forth, causing the electrical charge to vary. This variation in charge is then amplified and sent through a cable to an amplifier or other device.
- A third type of microphone is the ribbon microphone
This type of microphone uses a thin ribbon of metal suspended between two magnets. As sound waves hit the ribbon, it vibrates back and forth, causing a small electrical current generated. This current is then amplified and sent through a cable to an amplifier or other device.
Also from these types of microphones, there are also other variations such as USB microphones, Boundary microphones, and lavalier microphones. Which has been developed to cater to specific needs and applications.
A microphone works by converting sound waves into electrical signals through the use of a diaphragm, coil, magnet, or ribbon. These signals can amplify, recorded, or transmitted through a medium such as radio waves or a wire. The choice of microphone depends on the intended use. Whether it be for live performances, recording studios, or broadcasting.
How can you use a wireless microphone?

A wireless microphone can be used in a variety of settings, including:
- Live Performances
Wireless microphones are often used in live performances. Like concerts and theater productions. To give performers the freedom to move around the stage without being tethered to a sound system.
- Presentations
Wireless microphones are also used in presentations and speeches, allowing the speaker to move around the room while still being heard.
- Broadcasting
Wireless microphones are used by television and radio broadcasters to capture live audio in the field.
- Interviews
Journalists or researchers use wireless microphones for interviews, allowing them to move around the subject and capture audio from different angles.
- Houses of worship
Wireless microphones are also used in houses of worship, such as churches and synagogues, to amplify the voice of the pastor or rabbi.
- Fitness instruction
Wireless microphones are also used in group fitness instruction. Like aerobics and dance classes, to amplify the instructor’s voice.
- Conferences and Meetings
Wireless microphones are also used in conference halls, boardrooms, and other meeting spaces, to amplify the voice of the speaker.
Wireless microphones provide a lot of flexibility, convenience, and ease of use. It allows the user to move around without the limitation of tethering to a sound system. Making it ideal for various settings such as live performances, presentations, broadcasting, interviews, houses of worship, fitness instruction, and conferences.
Why do you need a wireless microphone?

There are several reasons why you may need a wireless microphone:
- Freedom of Movement
Wireless microphones allow the user to move around without the limitations of a physical connection to a sound system or recording device. This is particularly useful in live performances, presentations, and broadcasting. Where the person using the microphone needs to move around a lot.
- Improved Sound Quality
Wireless microphones can help to improve the overall sound quality of an event or recording by reducing the risk of interference and distortion caused by a physical connection.
- Increased Flexibility
Wireless microphones can use in a variety of settings and with a variety of sound systems. Making them versatile options for different applications.
- Ease of Use
Wireless microphones are generally easy to set up and use. Which can save time and reduce stress for the person using the microphone.
- Cost-effective
Wireless microphone systems are more cost-effective than wired systems. It is especially useful for events that take place in different locations.
- Safety
Wireless microphones end the need for cords and cables on the floor, reducing the risk of tripping and falling.
Wireless microphones offer a lot of benefits. For example, freedom of movement, improved sound quality, cost-effectiveness, and safety. These factors make wireless microphones an essential tool for a variety of settings and applications. like live performances, presentations, houses of worship, fitness instruction, and conferences.
An ultimate guide for Using a wireless microphone
Using a wireless microphone can be a bit more complex than using a wired microphone, but with a little bit of knowledge and practice, it can be a breeze.
Here is an ultimate guide to using a wireless microphone
- Choose the right type of microphone
Before you begin, it is important to choose the right type of wireless microphone for your specific needs. There are different types of wireless microphones, including handheld microphones, lapel, and headset microphones. Each with its own unique properties and uses.
- Check the frequency
Make sure the frequency of your wireless microphone is compatible with your sound system or recording device. Most wireless microphones use either UHF or VHF frequencies. So check that your system can handle the frequency of your microphone.
- Connect the receiver
Connect the wireless microphone’s receiver to your sound system or recording device. This will involve plugging the receiver into an audio input on the device.
- Turn on the microphone and receiver
Turn on the microphone and the receiver, making sure that they are both on the same frequency.
- Adjust the volume
Adjust the volume of the microphone and the receiver to ensure that the audio is at the desired level.
- Test the microphone
Before you begin your event or recording, test the microphone to ensure that it is working and that the sound quality is good.
- Use a fresh set of batteries
Make sure that the batteries in the microphone are fresh. As this will help to ensure that the microphone works throughout your event or recording.
- Keep the microphone away from other electronic devices
Electronic devices like phones and laptops can interfere with the microphone’s signal. So keep your microphone away from other electronic devices as much as possible.
- Turn off the microphone and receiver
When you’re finished using the microphone, be sure to turn it off. Along with the receiver to conserve battery life and prevent unwanted interference.
Using a wireless microphone requires a bit more setup and preparation than using a wired microphone. But it is well worth the effort for the added freedom and flexibility that it provides. By following these steps, you will be able to use your wireless microphone with ease and confidence.
How to set up a microphone?
Setting up a microphone can vary depending on the type of microphone and the device you are using it with. But here is a general guide to setting up a microphone.
- Determine your connection type
The first step in setting up a microphone is to determine the type of connection it uses. The most common types of connections are USB, XLR, and 3.5mm (1/8 inch) audio jack.
- Connect the microphone to the device
Once you have determined the connection type, connect the microphone to the device you will be using it with. If you are using a USB microphone, simply plug it into a USB port on your computer. If you are using an XLR or 3.5mm microphone, you may need an adapter or audio interface to connect it to your computer.
- Adjust the settings
Once the microphone is connected, adjust the settings on your computer or device to ensure that it is set as the default audio input. On a Windows computer, you can do this by going to the Sound settings in the Control Panel. On a Mac, you can go to the Sound settings in the System Preferences.
- Test the microphone
Before you begin using the microphone, test it to ensure that it is working well. You can do this by speaking into the microphone and checking the level meter on your computer or device.
- Configure the software
If you will be using the microphone with specific software, such as a recording or streaming program, configure the software to recognize the microphone and adjust the settings as necessary.
- Optimize the placement
Finally, make sure you place the microphone in the optimal position for your use case. This can be a few inches away from your mouth, pointing towards your voice and away from other noises or sounds.
Setting up a microphone involves determining the connection type, adjusting the settings, and optimizing the placement. By following these steps, you can ensure that your microphone is set up and ready for use.
How to Boost microphone volume?
Here are a few tips for boosting the volume of your microphone:
- Adjust the microphone settings on your computer or device
You can adjust the microphone settings on your computer or device to increase the volume. On a Windows computer, you can do this by going to the Sound settings in the Control Panel. On a Mac, you can go to the Sound settings in the System Preferences.
- Use a microphone pre-amp
A microphone pre-amp can use to boost the volume of the microphone before it reaches the computer or other device. This can help to increase the volume of the microphone.
- Use a software equalizer
Many computers and devices have software equalizers that can use to boost the volume of the microphone. This can be done by increasing the volume of the frequency range of the microphone.
- Check the placement of the microphone
Make sure that the microphone is placed in the optimal position for your use case. This can be a few inches away from your mouth, pointing towards your voice and away from other noises or sounds.
- Use an external amplifier
If you are still not satisfied with the volume. You can use an external amplifier between your microphone and your computer or other devices to boost the volume even more.
- Clean the microphone
Sometimes, dust and debris can accumulate inside the microphone and affect its performance. Try cleaning the microphone with a soft brush or compressed air to ensure that it is free of dust and debris.
- Check the cable
Make sure the microphone cable is plugged in well and check if it’s not damaged.
By following these tips, you can boost the volume of your microphone and improve its performance. Keep in mind that boosting the volume too much can cause distortion or clipping. So it’s important to make the adjustments gradually and listen to the audio to find the sweet spot.
What is a condenser microphone?

A condenser microphone is a type of microphone that uses a thin metallic diaphragm placed close to a metal plate called a backplate. A small amount of voltage is applied to the diaphragm, creating a small electrical charge. As sound waves hit the diaphragm, it moves back and forth, causing the electrical charge to vary.
Which is then amplified and sent through a cable to an amplifier or other device. Condenser microphones are known for their high sensitivity and wide frequency response. They are used in recording studios and broadcasting.
When and Who invented the microphone?
The first microphone was invented by Alexander Graham Bell in 1876. Bell is best known for his invention of the telephone. He used his knowledge of acoustics and sound to develop the first practical microphone.
Bell’s original microphone used a diaphragm made of metal. It had to be connected to a transmitter. Which converted the sound into electrical signals that could be sent over a wire. This invention was an important step in the development of the telephone and other forms of communication. They rely on electrical signals to transmit sound.
How to change microphone sensitivity?
The process of changing the sensitivity of a microphone can vary depending on the specific microphone. Here is a general guide to changing the sensitivity of a microphone.
- Locate the sensitivity settings
The sensitivity settings for a microphone can be found in the device’s settings or audio preferences. On a Windows computer, you can find the settings by going to the Sound settings in the Control Panel. On a Mac, you can find the settings by going to the Sound settings in the System Preferences.
- Adjust the sensitivity
Once you have located the sensitivity settings. You can adjust the sensitivity of the microphone by moving the slider or adjusting the numerical value. Increasing the sensitivity will make the microphone more sensitive to sound. Also decreasing the sensitivity will make it less sensitive.
- Test the microphone
After adjusting the sensitivity, test the microphone to ensure that the sound quality is good. Be sure that the microphone is capturing the desired level of sound.
- Check the software settings
If you are using the microphone with specific software. Check the software settings to see if there is an option to adjust the microphone sensitivity.
- Check the hardware settings
Some microphones come with a hardware switch or button to adjust the sensitivity. Check if your microphone has any of those options, this way you can control the sensitivity of the microphone.
Changing the sensitivity of a microphone can be done by adjusting the settings on the device or software you are using with. By following these steps, you can ensure that your microphone is capturing the desired level of sound and that the sound quality is good.
Keep in mind that sensitivity levels can vary depending on the specific microphone. So it’s important to refer to the user manual or consult with the manufacturer for specific instructions.
Final Words/Conclusion
A microphone is a vital tool for capturing and transmitting sound. Whether it be for live performances, recordings, or broadcasting. Understanding how a microphone works. Different types of microphones are available. How to set it up? how boost the volume? These are important steps ensuring that you get the best performance out of your microphone.
Wireless microphones offer added flexibility and freedom of movement, making them a popular choice for many different applications. With the right knowledge and practice, you can use your microphone with ease and confidence to capture and transmit sound in a variety of settings.


